Physiotherapy in West Vancouver for Work Activities
Preventing Musculoskeletal Disorders.
Choosing the correct tool for the job, and the correct tool for you, can help your working day pass more  comfortably and reduces your risk of work-related musculoskeletal problems.
Some common problems related to hand tool use include carpal tunnel syndrome, tendonopathies and Raynaud's Syndrome ("white finger"). Symptoms that may indicate you have a problem related to hand tool use include arm, hand or finger tingling, numbness, discoloration, pain or discomfort. If you have a musculoskeletal problem related to tool use, we may offer customized advice for modifying your tool use.
The following tips are intended for injury prevention.
Key points to considering when selecting a tool:
- Is the function of the tool suited to the task?
- Your capabilities.
- Tool weight and balance.
- Handle shape and grip.
- Trigger positions.
- Tool power.
- Vibration exposure.
- Tool condition.
Other general ergonomic risk factors such as awkward postures and prolonged positions should also be considered.
Is the function of the tool suited to the task?
- Will the size of the tool fit the task? Your tool needs to fit in the space surrounding the job, and needs to have components that fit the task, for example the size of a spindle and socket must match the screw to be tightened. A poorly fitting tool will place you in an awkward position, and may lead to contact stress, bumps and grazes.
- Power versus non-power? If frequent force and repetitive movement is required to complete a job then a power tool is often a good choice. Power tools reduce the force exposure and twisting movements to your upper limbs and therefore reduce your risk of injury. For brief jobs without high force requirements, a non-powered tool may suffice.
- Is the tool capable of producing the required amount of torque or power for the task?
- Don't forget to read the manufacturer's instructions.
Your capabilities.
Are you strong enough to safely handle the tool? In particular, power tools produce forces that must be counteracted by the tool user in order to stabilize the tool. The tool handle and your whole body position help to resist the forces generated by tools, but your hand, wrist and arm take the brunt of the work. Be sure that you know how to use the tool properly and have the physical capabilities to do so. If you are physically fatigued, or your concentration is low, then take a break from that task.
Select a tool that can be used with your dominant hand, or either hand.
Tool weight and balance. Precision hand tools should be as light as possible (no more than 1.75kg) and power tools should be about 1.5kg (no more than 2.3kg).
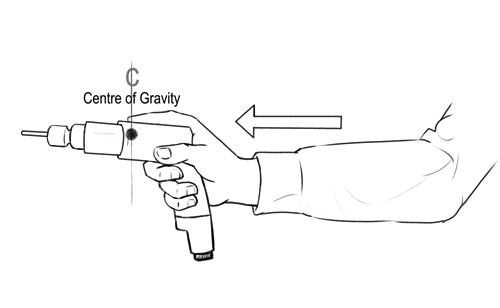
The centre of gravity of your tool should be aligned with the centre of your gripping hand. This means that when your tool is set up for use, with attachments and leads all in place, you should be able to easily hold the tool pointing horizontally or downward without the tool feeling as though it could tip (Ref).
Counter-balancers should be used with heavy or poorly balanced tools.
Handle shape and grip.
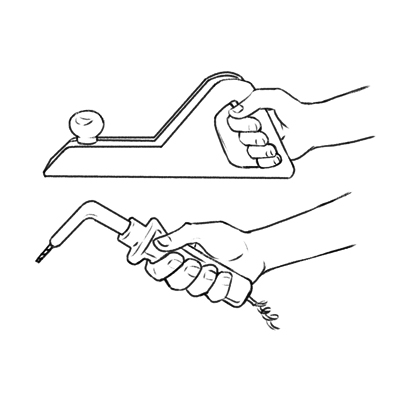
The tool handle should allow you to comfortably and safely grip and use the tool. With the exception of tools used for precision work, the shape of the handle should be designed for a "power grip". This means that your wrist is in a neutral position, with all the fingers grasping the handle. In this position, the muscles used for gripping are able to work most efficiently and are less prone to fatigue and injury. Tools applied with a horizontal force should have a bent handle, so that you don't need to excessively bend your wrist. Tools applied with a vertical force should have a straight ("in-line") handle.
 Figure 2. The "neutral wrist" or "handshake" position.
Generally, grip diameter should be 30-40mm, with circular or oval shape, and a handle length preferably at least 115mm long (Ref). This enables the fingers and palm to control the handle without the need for excessive compression and "contact stress" to the palm. Depending on the materials you are working with and the environment you are working in, it may be necessary to wear gloves. If this is the case, make sure that the gloves fit you well, and don't have so much bulk in the palm of your hand that your grip diameter is increased beyond the recommended size. If you intend to wear gloves while using the tool, the handle length may need to be longer.
Tools for precision may have a diameter of 5-12mm since high levels of force are not involved. (Ref)
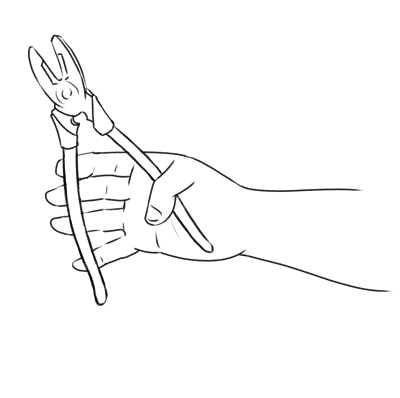
Grip span refers to the distance between handles that separate in tools used for cutting, gripping or crushing. When the handles are closed the grip span should be at least 50mm. When the handles are open the grip span should be no greater than 85mm. The handles should not have finger grooves or sharp edges. (Ref)
 Figure 3. Grip span measurement.
Your tool handle should be made from non-slip and non-conductive material. Tape or rubber sleeves may be added to the handle but take care not to increase the handle diameter beyond the recommended parameters.
The overall effect of the handle shape and grip is that the tool should be easy for you to hold, preferably in one hand, during use.
Trigger positions.
Trigger placement should be far enough away from the handle (at least 50mm) that 2 or 3 fingers can be used to activate the trigger. This increases hand comfort and shares the load between the muscles and tendons of the fingers, helping to prevent "trigger finger".
Tool power.
There will often be a trade-off in injury risk factors when considering tool power. A higher powered tool may enable the task to be completed faster, and therefore reducing the amount of time you spend holding the tool. However, greater force is required of your upper limb to control higher powered tools. Your task will require a minimum power level from the tool in order to complete the task. You will need to weigh up the advantages and disadvantages, based on your capabilities, to decide whether a tool with the minimum power requirement will suffice or whether you will benefit from a tool of higher power.
Vibration exposure.
Anti-vibration gloves and tapes may not help reduce the vibrations that your tool produces. Vibration is best minimized at the tool design stage. If you often work with tools that produce high levels of vibration such as jackhammers and nut-runners, your vibration exposure should be considered in terms of time per day. You may need to plan your work so that the task is shared between colleagues, or the work is spread over time, interspersed with other tasks not involving vibration.
Tool condition.
Check that your tools are in good condition. Watch out for spintering handles, blunt edges and loose parts.
If the condition of your tool is poor then you may have to apply greater effort and you are more susceptible to injury due to the tool malfunctioning or breaking.


